A Beginner's Method
to Solve The Cube
Basics
Solving the Cube
- Step 1: Bottom Edges
- Step 2: Bottom Corners
- Step 3: Middle Edges
- Step 4: Top Edges
- Step 5: Solve Edges
- Step 6: Position Corners
- Step 7: Solve Corners
- Done
Extras
Summary of the LBL-Y Method
Here is a brief summary of the LBL-Y Method. It is not meant to be self-explanatory, but can serve as a minimal reference. Also, sometimes it is hard to see the cube for the cubies, so it may be helpful to review the key points.
Preliminaries
The LBL-Y method is a method to solve the Rubik's Cube suitable for beginners. We solve the cube mostly layer-by-layer, but leaving one edge of the cube free as workspace.
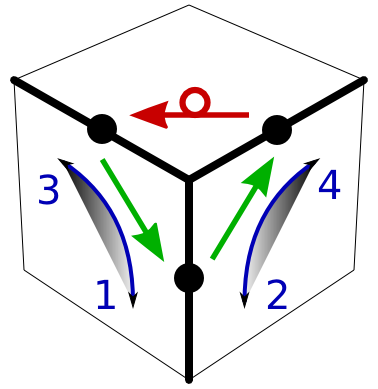
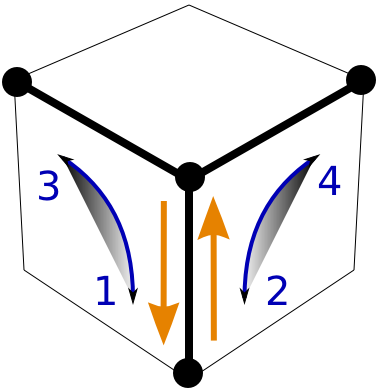
The method is built around the use of a single algorithm, which we call the Y-move. We define
- Y = F Ri Fi R,
| The Y-move
|
The Y-move, together with some elementary quarter-turn moves to prepare and restore the cube, can solve the cube in a rather simple manner, which is outlined below.
Step 1: Solve 4 Bottom Edges
- Use elementary moves.
- Since the only restriction is to preserve solved bottom edges, elementary moves for prepare, work, and restore are sufficient.
Step 2: Solve 3 Bottom Corners
- Use Y-move to move corner cubies between top and bottom layer.
- The Y-move also rotates the cubies. Worst case is white facelet on top, which you can do with Y and a sideway Y, or with three standard Y-moves.
- Or use elementary prepare/work/restore.
- Not much harder than Step 1 because only the bottom layer has to be preserved.
- Leave one corner unsolved as part of the free column workspace.
Step 3: Solve 3 Middle Edges
- Use Y-move to move edge cubies between top and middle layer.
- Pick Y-move to do the move with or without flip.
- Prepare bottom with D to put free corner cubie at the foot of the Y-move that you want to do. Restore afterwards.
- Straightforward because we can focus on moving and flipping a single cubie, and because we can do U-moves freely and have a free corner cubie in the bottom.
- Leave the edge above the free corner unsolved as part of the free column.
Step 4: Adjust Swap Count of Remaining 5 Edges
- We would like to solve the remaining edges with Y-moves in a standard prepare, Y, restore conjugate. Such moves do an even number of edge swaps. Therefore, first count the number of edge swaps that we need to perform.
- If even, proceed to Step 5.
- If odd, perform a single U-move, then proceed to Step 5.
- If confusing, count again after the single U-move. Or solve one or two of the edgies, and then count. Correct with single U as needed.
- This works because a single U amounts to an odd number of swaps (a 4-cycle doing 3 swaps).
Step 5: Solve Remaining 5 Edges
- Use Y-moves and symmetric conjugates like U Y Ui to move and flip edge cubies in the top layer and the workspace edge in the middle.
- Make sure to only do an even number of U quarter-turns to preserve the even swap count created in Step 4.
- Straightforward because we can focus on a single edge cubie and how to move and flip it with Y.
- There are minor restrictions on the order in which we solve the edge cubies. Start with solving two adjacent edgies in the top layer, say the two in the back away from the workspace. Adjacent and not opposite to each other because Y works on adjacent cubies. In the top layer because we need the workspace edgie until the end.
- Straightforward also because after solving 3 edges the remaining 2 fall into place automatically. We cannot get stuck with a single swap missing because in Step 4 we made sure that there is only an even number of swaps. If there is a mistake, simply redo Step 4.
- With 3 of the 5 edges solved and the last 2 edges in their correct position, either we are done or we need to flip those 2 edges in place. This is a standard application of two Y-moves.
Step 6: Position Remaining 5 Corners
- Positioning means moving a cubie into its final position but ignoring its orientation.
- Use two Y-moves. Use Y to move a corner cubie out of the top layer into the bottom workspace corner, then use Yi to bring it back into the top layer in a different position.
- For example, y U yi Ui, where y is the 'upside-down' Y-move that affects the workspace edge and two edges in the bottom (as opposed to in the top).
- Straightforward because we can focus on moving a single cubie. But we have to do it twice, back and forth between top and bottom with Y and Yi, in order to preserve the edge cubies.
- Straightforward also because after positioning 3 corners the remaining 2 fall into place automatically. We cannot get stuck with a single swap missing, since after solving the edge cubies there can only be an even number of corner swaps. Count them.
- Optional for efficiency, but natural: First check the corner cubie in the bottom workspace. If it is from the top layer, focus on moving it to the top with the right orientation (works if top facelet is on the side). Then undo that Y-move by its inverse bringing an other corner cubie down.
Step 7: Solve Remaining 5 Corners
- Use four Y-moves. Use YY to rotate a corner cubie in place without moving it, then swap in another corner cubie and use YiYi to rotate it into the opposite direction while restoring the cube.
- For example, yy U yiyi Ui, where y is the upside-down Y-move.
- Straightforward because we can focus first on rotating a single cubie, then on rotating a second cubie in the opposite direction.
- To rotate the bottom workspace cubie, apply additional preparation moves, perhaps simply turning the entire cube, so that it is moved to the top together with the second cubie. Or apply the y-move sideways.
- The yy-yiyi move applies one clockwise and one counter-clockwise rotation. Do this twice to handle the case of three clockwise (or counter-clockwise) rotations. Or use yy-yy-yy with appropriate U setups to do three rotations in the same direction.
- Finishing the last rotations with pairs of clockwise/counter-clockwise rotations works because the cube can only have in-place cubie rotations that add up to multiples of 360 degrees.
Step 8: Done
- Be happy.
- Do it again.
Comments
Remarkably, it is sufficient to focus on a single cubie at a time and use a single sequence (in several different ways). Move the cubie with Y while flipping/rotating it along the way. Clearly, if we really could move and orient single cubies, then we could solve the cube. The catch is that there always are side effects. There is no move changing only a single cubie. Therefore, it is a non-trivial statement that we can do Y-moves in the way described focusing mostly on a single cubie, although two or more cubies move. There is enough magic in the laws of the cube that in the end the last cubies fall into place and/or are oriented automatically.