A Beginner's Method
to Solve The Cube
Basics
Solving the Cube
- Step 1: Bottom Edges
- Step 2: Bottom Corners
- Step 3: Middle Edges
- Step 4: Top Edges
- Step 5: Solve Edges
- Step 6: Position Corners
- Step 7: Solve Corners
- Done
Extras
Step 1: Solve Bottom Edges
| Solve all four bottom edge cubies. Facelets we do not care about are shown as dark gray. We start with the cube on the left, and Step 1 gives the cube on the right. |
|
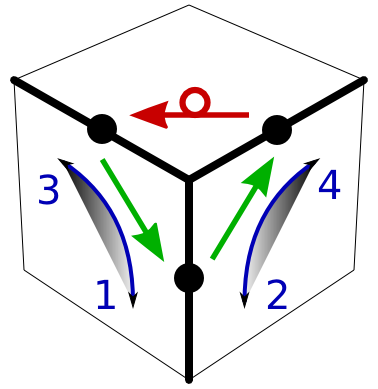
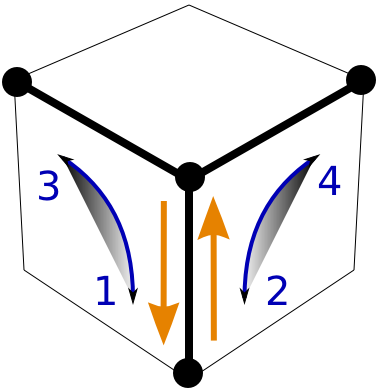
Basic Idea
Use elementary moves.
This step can easily be done with elementary moves because we do not have to worry yet about disturbing the rest of the cube. It becomes intuitive rather quickly. Just practice until it is straightforward.
Details
Here are some explicit suggestions, but keep in mind that there are many options and many short cuts. To keep things simple, focus on a single edge cubie with a white facelet. Figure out where it is supposed to go. Take note of the cubies that are already solved and that should still be solved afterwards. A pattern that we will use all the time is:
- Prepare. Move solved pieces out of the way, move your target location in a convenient spot, etc.
- Work. Do the move or move sequence that does the main work.
- Restore. Undo the preparations, move solved cubies or target locations back into their proper place, etc.
Suppose we want to solve the orange-white edge cubie, and let's assume 2 or 3 of the other bottom cubies are already solved, so that we are restricted in our moves of the bottom layer. In general, there are three cases: the cubie you want to work with can be found in the top, middle, or bottom layer.
- The orange-white cubie is in the middle layer.
The o.w. cubie can have two orientations.
Prepare by moving the D-layer.
A single turn puts o.w. in its right place with the correct orientation.
Restore by doing the inverse D-move. - The orange-white cubie is in the top layer.
Do a U-move to put the o.w. cubie above the orange face.
Left: With the white sticker on top, all we need are two R-moves.
Right: With the white sticker on the side, one R-move puts the cubie into the middle. Continue as in 1. - The orange-white cubie is in the bottom layer.
Turn the side containing the cubie to move it into the middle layer. Continue with 1.
Comments
Remember, there are shortcuts. Can you do 2./right in three turns?
We choose white for the color at the bottom of the cube, although any color would do. This step is also called building the 'white cross'. Note that the bottom edge cubies not only have the white sticker on the bottom face, but the colors on the four sides match as well.
Try doing moves that anticipate other moves, e.g. if you have a choice, pick a sequence that moves other edges into a better place simultaneously. Advanced techniques combine edge with corner moves. Reportedly, the white cross can be formed in 6 to 8 moves on average if you are circumspect.