A Beginner's Method
to Solve The Cube
Basics
Solving the Cube
- Step 1: Bottom Edges
- Step 2: Bottom Corners
- Step 3: Middle Edges
- Step 4: Top Edges
- Step 5: Solve Edges
- Step 6: Position Corners
- Step 7: Solve Corners
- Done
Extras
Step 6: Position Remaining Five Corners
|
Move remaining corner cubies |
|
Basic Idea
Use Y-moves to swap two corners along the vertical edge of the work space.
We use the 'upside-down' version of Y, which we denote by y, which affects the vertical edge of the work space as usual, and two edges in the bottom of the cube. Only one corner cubie in the top layer is affected.
The basic move that preserves all edge cubies and most of the corner cubies is y U yi Ui.
Details
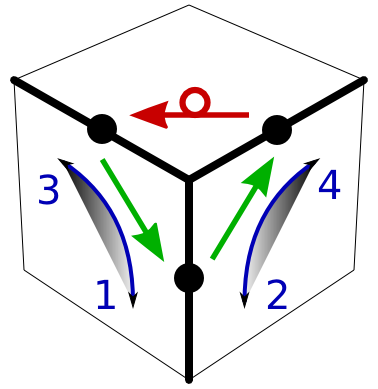
Let us first compare our standard Y-move with its upside-down version, the y-move. The standard Y-move does a "down-down-up-up" along the front-right vertical edge, while the y-move does a "up-up-down-down" along the same edge:
Y = F Ri Fi R
|
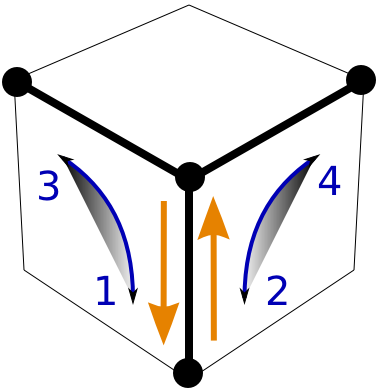
y = Fi R F Ri
| Cubies that move are shown in dark gray. Note that for the upside-down move only one corner cubie in the upper layer is affected. Also note that y is not the inverse of Y. |
The key idea is that we can combine y with yi to move corner cubies while leaving most of the cube unchanged. For example:
|
|
Position one corner cubie in top layer. |
However, the full story of this move is that we actually do a cycle involving three corner cubies:
|
| The two moves shown cycle three of the corner cubies in the front face. Bottom goes up, up goes left, left goes to the bottom. Notice that in this example we can bring the o.g.y. cubie from the bottom to the top with the correct orientation if we pick the move yi Ui yU. |
We can now formulate our strategy to put all 5 remaining corner cubies into their final position.
- Pick a top-layer corner cubie that is in the wrong position in the top-layer.
- Swap it down, then up into its correct position using moves like y Ui yi U etc.
- Repeat steps 1. and 2. until all cubies are in their correct position.
- Sometimes, but not always, you will find a top-layer cubie in the bottom workspace corner. If possible, pick moves that put it into its target location with the correct orientation.
Comments
Contrary to the situation for the last two edge cubies, we cannot get stuck with a single swap missing. The reason is that since we already solved the edge cubies, the laws of the cube do not allow a single swap of corner cubies to be left over.
Alternatives
Rather than introducing the y-move, we could simply turn the entire cube upside down, putting white on top and yellow on the bottom, and use the standard Y-move. We use the y-move to keep the cube in its standard orientation.
The Wikibook-2008 solution for positioning the final five corners is based on the move L D D Li, or L D2 Li. When counting D2 as one elementary move, this move uses three elementary moves compared to the four in FRiFiR. An additional simplification is that LDDLi is its own inverse (doing LDDLi twice gives you the identity), although this aspect is lost to some degree when doing Step 7, orienting the corners. We can build a three cycle of corners in the same way as we did with the y-moves:
|
|
Two LDDLi in a commutator with a U-move cycle three corners as shown
without affecting anything else. Here: |