A Beginner's Method
to Solve The Cube
Basics
Solving the Cube
- Step 1: Bottom Edges
- Step 2: Bottom Corners
- Step 3: Middle Edges
- Step 4: Top Edges
- Step 5: Solve Edges
- Step 6: Position Corners
- Step 7: Solve Corners
- Done
Extras
Example
Here is a complete example for unscrambling a cube with the strategy and the moves explained under step 1 to 7.
In almost all cases the cube is oriented such that white is on the bottom. We write for example "orange in front" and mean that the entire cube was rotated such that the orange face is in the front (and white is on the bottom).
Scramble the cube
| We begin by scrambling the cube. Start with a solved cube, white on bottom and green in front. Do U Ri U2 Li Bi D Fi Ui Ri Ui. |
Step 1: Bottom Edges
Use elementary moves.
Pick white as the color on the bottom. Turn the entire cube and look for edge cubies with a white sticker.
| Focus on white-green edge cubie.
Orange in front.
|
|
Blue-white edge:
Orange-white edge:
Red-white edge: |
We did not work very hard on scrambling the cube, so the first step happens to be rather simple. Only the red-white edge requires some effort. First we move it into the middle layer (R). Then we move the target location with Di so that a simple F puts the cubie in the right position in the bottom layer with the white sticker down. Finish with D.
Step 2: Bottom Corners
Use the Y-move to swap corner cubies from the U-layer into the D-layer along a vertical edge. Choose between Y and its inverse to get the orientation right at the same time.
Look for corner cubies with a white sticker. In this example, there does not happen to be a single corner cubie in the easiest position, which is the top layer with white on the side. There are two in the top layer with white on top. These are the cases that require two Y-moves (or three if we only do Y in the standard orientation).
|
White-blue-red corner: |
|
White-orange-blue corner: |
The white-green-orange corner now requires just another inverse Y-move, but let us demonstrate swapping a corner out of the bottom layer.
|
White-red-green corner: |
With green in front, we are in the standard configuration after step 2. We could easily fix the final bottom corner, too, but we leave this corner unsolved because it is part of our manouvering space.
Step 3: Middle Edges
Use Y to cycle edge cubies from the U-layer into the M-layer. In preparation of the Y-move, turn D to move the remaining free bottom corner into the corner position that is affected by the Y-move.
Look for edge cubies without a yellow sticker, but ignore the green-orange cubie which is a part of the spare vertical column.
|
Orange-blue edge:
Blue-red edge:
Red-green edge: |
After putting the D-layer into its original position and with green in front, we are in the standard position after step 3.
Step 4: Adjust Edges
Recall that the Y-move does two edge swaps, but we may need an odd number of swaps. Let's fix this right away. We leave solving all 5 edgies to Step 5, where the last 2 fall into place automatically because we adjusted the edges here. Our example is close to a worst case. You might prefer to first solve one or two edgies to simplify the swap count.
Count the number of swaps of the remaining unsolved edges. If the number of swaps is even, do nothing. If the number of swaps is odd, do one elementary U-move.
|
Counting swaps: Do one U quarter-turn. This leads to a 5-cycle representing 4 swaps, which is an even number. |
We could have done one Ui, which puts two edges in the right position and leaves one 3-cycle for a total of 2 swaps. However, rather than having the yellow-blue and yellow-orange edges in the correct position but flipped, it sometimes helps to have such edges in the wrong position. Then the Y-move can move them into the correct position with a flip.
Step 5: Solve Edges
Use the Y-move to cycle edges around the up-front-right corner. Use U to prepare this move. Do not forget to undo this move with the exact inverse of your preparations, or the even-number-of-swaps property is lost.
First, we do the up-back and up-left edges, which require some U-layer preparations.
| Green front.
Blue-yellow edge:
Red-yellow edge: |
The remaining 3 edges are in the position of a standard Y-move cycle. In our example, only one Y-move remains to be done.
| Green front.
Remaining three edges: |
Step 6: Position Corners
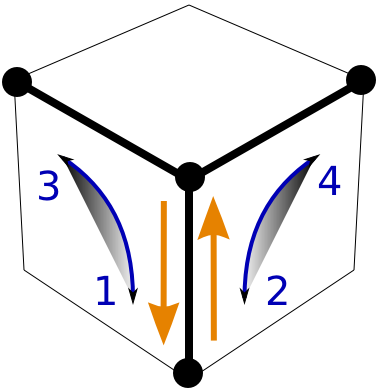
Use Y-moves to swap corners between the upper layer and the bottom layer. Since only corner cubies are to be moved, we do a Y-move, a U-move, the inverse of the Y-move, and the inverse U-move. This cycles 3 corner cubies without affecting anything else. For the five unsolved corner cubies arranged in the standard configuration as shown above, use Y in the "upside-down" version.
|
Yellow-green-red corner: |
Two more cubies have to be positioned this way, the remaining two fall into place automatically.
|
Yellow-red-blue corner: (Could have solved yellow-orange-green instead.) |
|
Yellow-orange-green corner: |
Step 7: Solve Corners
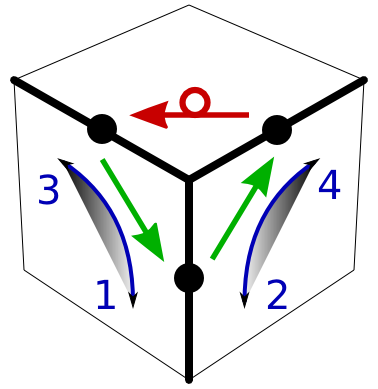
Using a particular Y-move twice in sequence rotates corner cubies without moving them (because we swap corners back and forth once).
Consider the upside-down Y-move. 2*FiRFRi rotates the up-front-right corner cubie by 120 degrees in the counter-clockwise direction. Clean up by either following 2*FiRFRi with 2 times its inverse, or by doing a total of 6 FiRFRi's.
Combine these moves with U-moves to orient cubies in the upper layer. Recall that you may have to turn the entire cube to apply this strategy to the cubie at the bottom of the vertical column.
In the example, all we need is one clockwise and one counter-clockwise turn of a cubie in the top layer.
|
Rotate cubies in top layer: |
We Are Done
| Isn't it beautiful. |